
 Portal
Current date/time is April 27th 2024, 2:57 am
Search found 97 matches for ffffff
Personalize the color palette of the editor
| Personalize the color palette of the editor |
The following tutorial will allow you to create your own palette of colors to use on your Forumotion forum. This tutorial can be used on any forum version. 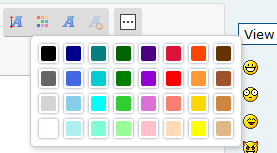 Installing the Script 1. ) Go to : Administration Panel > General > Messages and e-mails > Configuration Make sure that the color palette is set to simple :  2. ) Go to : Administration Panel > Modules > HTML and JavaScript > JavaScript codes management Make sure that JavaScript codes management is enabled on your forum :  Once done, create a new script by clicking the following button :  Title : Personalized color palette Placement : In all the pages
How do you change the current colors ? For example we'll use the color white :
mColorBasic["White"] : Sets the name of the color ( it appears in a tooltip on hover ) #FFFFFF : Is the hex color for white ( use this to get the hex color ) Installing the Style Go to : Administration Panel > Display > Colors > CSS stylesheet Copy and paste the following code :
Then submit and it is done !  |
This tutorial was written by Ange Tuteur |
- on August 4th 2014, 1:09 pm
- Search in: Tips & Tricks
- Topic: Personalize the color palette of the editor
- Replies: 0
- Views: 7360
phpbb2 : Have a vertical navigation bar
| Have a vertical navigation bar for phpbb2 |
The following tutorial will help you get a vertical navigation bar on your Forumotion forum. Demonstration : Vertical navigation bar Before making any changes, make sure that your forum meets the following conditions : - You must be the founder of the forum and have access to its templates. - Your forum version must be phpBB2. Modifying the overall_header template Go to Administration Panel ► Display ► Templates ► General and edit (  ) the overall_header template. ) the overall_header template. Locate this part of the template, which contains the variable {GENERATED_NAV_BAR} :
and replace it with :
Explanation : By placing the variable that generates the navigation bar in a div, and giving it the class vertical_nav, will allow us to modify its style with CSS. Once the modifications are complete, save and publish the template by clicking the green plus "  " in the template list. " in the template list.Modifying the CSS stylesheet Go to Administration Panel ► Display ► Colors ► CSS stylesheet tab. Add the following code to your sheet :
Explanation : position:absolute; allows us to place the navigation bar as a floating element top:50px; allows us to position our block 50 pixels from the top of the page left:5%; allows us to position our block 5% from the left of the page Note: If you want the block to stay where it is while scrolling the page, you must replace position:absolute; with position:fixed; To finish, add the following code to your sheet :
Explanation : display:list-item; allows us to see the links in the navigation bar as a list from top to bottom list-style:none; allows us to remove the style originally assigned to the lists (the bullets : •) If you want to add a border to your navigation as in the demonstration above, just add on to the style of the element div.vertical_nav :
Explanation : background:#FFFFFF; allows us to color the background of the block white border:1px solid #D0D0D0; allows us to add a solid gray border of 1px Do not forget to save your changes, and most importantly, be creative! |
| This tutorial was written by Matriochka of the French support, it has been translated to English by Sir. Mayo, and corrected by Ange Tuteur. To submit a tutorial, please read the following topic : How to submit a tutorial |
- on April 7th 2014, 11:37 am
- Search in: Tips & Tricks
- Topic: phpbb2 : Have a vertical navigation bar
- Replies: 0
- Views: 10497
phpbb2 & punbb : Frame the avatar and / or profile of members
| phpbb2 & punbb : Frame the avatar and / or profile of members |
The following tutorial will allow you to add a customizable border in the "Author" box of messages on your Forumotion forum. Demonstrations : - Avatar framed - Entire Profile framed Before making any changes, make sure that your forum meets the following conditions : - You must be the founder of the forum and have access to its templates. - Your forum version must be phpBB2 or punBB. Modifying the viewtopic_body template Go to Administration Panel ► Display ► Templates ► General and edit :edit:the viewtopic_body template. - If you want to frame the avatar, locate this variable : (The modification below applies to both phpBB2 and punBB)
and replace it with :
- If you want to frame the entire profile, locate this part : (The modification below is only for phpBB2)
and replace it with :
Once the modifications are complete, save and publish the template by clicking the green plus " " in the template list.Modifying the CSS stylesheet Go to Administration Panel ► Display ► Colors ► CSS stylesheet tab - If you have framed the avatar, add this code to the sheet :
- If you have framed the entire profile (for phpBB2), add this code to the sheet :
- If you want to frame the entire profile (for punBB), add this code to the sheet :
Do not forget to save your changes. Explanations : background:#FFFFFF; gives the background a white color border:1px solid #000000; adds a solid black border of 1 pixel padding:3px; adds spacing between the content and the border by 3 pixels |
| This tutorial was written by Matriochka of the French support forum, it has been translated to English by ddoesmc, and corrected by Ange Tuteur. To submit a tutorial, please read the following topic : How to submit a tutorial |
- on March 31st 2014, 1:17 pm
- Search in: Tips & Tricks
- Topic: phpbb2 & punbb : Frame the avatar and / or profile of members
- Replies: 0
- Views: 10742
Customize attachments frame
| Customize attachments frame |
Following the update last week, Forumotion provides this trick so you can customize the attachments:
CSS addition
Add this code :
Summary of CSS properties: 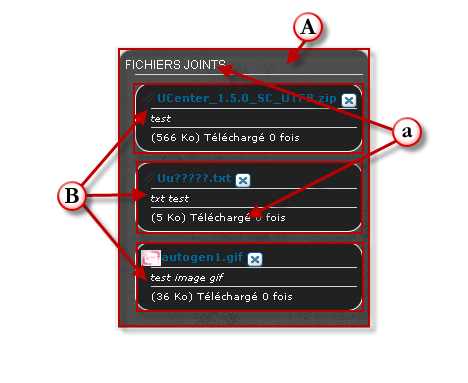
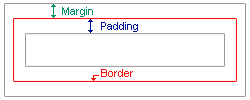 Image B |

 Display
 - on March 30th 2010, 9:53 am
- Search in: Tips & Tricks
- Topic: Customize attachments frame
- Replies: 1
- Views: 11967
Learning the basic CSS
| Learning the basic CSS |
Hello and welcome to this tutorial. The purpose of this tutorial is to learn you how to create and/or modify yourself the CSS of your forum. It's created for a phpBB2 version, but when you will have learned the basic points, you will be able to modify even another board. But let's begin immediatly ! Here is the organization of this tutorial : 1. CSS? What is it? 2. OK. But where is it? 3. How is the CSS organized? 3.1. Modifying an attribute 4. Basic values of CSS 5. Basic values of your forum 6. OK I've understood, but now I want to change something... 7. Recapitulative pictures 1. CSS? What is it? A CSS stylesheet is a file written at the same time than your site. In fact, it is very useful, because it enables you to write all the styles you want to put in your board in the same file. By modifying your unique CSS stylesheet, you can modify your whole site very quickly. Wihout CSS, you would have to modify each file from your template manually to get the same result. Programmers are very often lazy. And that's good ! 2. OK, but where is it? To access your CSS stylesheet, Forumotion made you the way simple. In fact you just need to go to your admin panel, and go to display-> colors. If needed, choose "yes" to the question "Deactivate the basic CSS", and click on the "save" button. Then when the page has reloaded, click on "See your forum basic CSS" and paste it into the white box called "CSS". Here is your basic forum CSS. Now, let's try to modify it ! 3. How is the CSS organized? The organization of CSS is very easy to understand. In fact, just imagine it as some boxes, with things in it. Every box represents a piece of your board, and every thing in the box represents an attribute of this piece. For example, the box "img" represent all the images of your board. In this box, you can find an attribute "border". By modifying it, you can choose to add a border to each image on your forum. Well of course, this example is useless, but it's for you to understand. Here is an example. To make a link to my example, the box here is ".bodyline", and the attributes are "background-color" and "border". A box can contain loads of attributes.
As you can see, a box's attributes are always between { and } for your browser to know the limits of the box. The attributes ALWAYS finish by a ";" so that the browser knos where the attribute stops. To illustrate my example, here is what the box "bodyline" represents. https://i.servimg.com/u/f86/13/66/78/75/sans-t37.jpg 3.1. Modifying an attribute. Let's at first modify the background-color. As the name means it, the background-color is the background-color of the bodyline. It's not interesting here. Let's modify the border. Here is the basic CSS code : border: 2px #6F0019 solid; 2px : The width of the border. #6F0019 : the hexadecimal code for the colour. solid : a solid line. But for your design, you prefer to have a black border of 5px, and dashed. Well it's easy, try this code : border: 5px black dashed; (click on the submit button to validate your changes). (you can use the real name of the color for basic colours like : blue, red, cyan, black, white, etc.). Here is the result : https://i.servimg.com/u/f86/13/66/78/75/sans-t38.jpg Awful, but that's not the point. Have you seen the change? 4. Basic values of CSS You will see in your stylesheet, there are some attributes that occur nearly for every box. That's because every box has it's own color, size, border, etc. Here are the most useful attributes you can use : 4.1. background-color: #FFA443; This represents the background color of the box. 4.2. background-image: url("https://i.servimg.com/u/f86/13/66/78/75/sans-t35.jpg"); This represents the background image of the box. You can add this to the code : background-repeat: repeat-x; This means the background will repeat horizontally. You can also use : repeat-y, no-repeat. If you don't put this attribute, the background will repeat horizontally and vertically. 4.3. border: solid #FF9F3B 0px; This modifies the border of the box. The explanation has already been discussed before. * you can modify only one side of the border bu using for example : border-top: solid #FF9F3B 0px; border-left: solid #FF9F3B 0px; This way, the bottom and right border won't be modified ! 4.4. width:80%; This is the width of the box. * "height" is the height of the box. 4.5. color: #ffffff; This is the font color used in the box. 4.6. padding: 2px; This represents the space between the border and the content of the box. * "margin" represents the space between the box and the rest of the page. 4.7. font attributes font-weight: bold; -> the font will be bold in the box. font-size : 12px; -> the font size will be 12px in the box. text-decoration: underline; -> the text will be underlined in the box. font-family: Verdana; -> the text in the box will be in "Verdana". These were the basic attributes. You can find on google for example more attributes to give more style to your boxes, but with only these, you can give a good look to your design. 5. Basic values of your forum The basic values of your CSS are in the "boxy" box. You can modify it to modify all your forum. Here is the body box of my board :
As you can see, my body box only enables me to modify my forum background-image, and the background color of the page. As you can see, I use this picture : https://i.servimg.com/u/f86/13/66/78/75/sans-t35.jpg for the background, that repeats only horizontally. Then I choose the background-color, that continues the page. This gives a nice effect of shade from the top of the board to the bottom. My body box is not very complete, but here is a body box more complete :
As you can see, you can modify what you want, and when you want it ! 6. OK I've understood, but now I want to change something... This is the biggest chapter of this tutorial. Indeed, to modify your board, you need to know what corresponds to what. You could learn by yourself by modifying something and see what is the result, but it takes long, and is not really easy. In this chapter, I will provide you pictures of the boxes, and their names, so that modifying them will be much more easy ! To have an example on how to modify an attribute, check point 3.1 ! Let's start slowly. I will at first show you which part of the CSS is really useful to modify. If you want more, just check google to get more infos !
Already seen before, just re-read it !
The "a" box represents the links on your forum. a:active and a:visited represent the links already clicked by the user, and a:hover represent a link while the user's mouse is on it.
Already seen before, just re-read it !
Check the picture to see what is what : https://i.servimg.com/u/f86/13/66/78/75/sans-t39.jpg
The categories title, and the link in it (the "a" represent a link, as seen before).
The link you click to open a forum and begin to discuss.
Here is the picture that corresponds to this code : https://i.servimg.com/u/f86/13/66/78/75/sans-t40.jpg
This is to modify the code and quote boxes, in the post.
This is to modify the page copyright.
The mod and admin colors. The rest is just about the input buttons, forms etc. I don't advise you to modify them, because very often this make the forum unreadable because of contrasts problems. Just by modifying these boxes, you will give a good look to your board ! * If you need a precise CSS code modification, ask it to me by PM, and I will add it to the tutorial ! 7. Recapitulative pictures Here are some screenshots that show you which box modifies what. If you need more pictures, just ask by pm ! Index page : https://i.servimg.com/u/f86/13/66/78/75/sans-t42.jpg Forum Page : https://i.servimg.com/u/f86/13/66/78/75/sans-t43.jpg Post Page : https://i.servimg.com/u/f86/13/66/78/75/sans-t44.jpg I hope this tutorial will help you to understand how your CSS works. If you need more precisions on a point, or more CSS code to help you, don't hesitate to ask it by PM, and I will add it to the tutorial. |
| This tutorial was written by ~Splytte~. |
- on April 19th 2009, 8:19 pm
- Search in: Frequently Asked Questions
- Topic: Learning the basic CSS
- Replies: 0
- Views: 12677
CSS Tutorial for your forums
| CSS Tutorial for your forums |
Quick CSS tutorial to make your forum look smarter. Throughout the forum CSS has been referred to, to make text larger, smaller and to align text and tables however it can also be used to clean and hide certain parts of the forum. Relatively easy to use, CSS only hides the forum sections to make it look cleaner rather than deleting sections just in case you change your mind later. 1. Log into your forum and access the “Administrator Panel” 2. Select “Display” 3. Select “Colors” 4. You should now be able to select the “CSS Style Sheet” tab ! The sheet will be blank if you have not used this before! 5. Once you selected the relevant text from below simply add the text to this section and press “Submit”, this will be reflected on your forum immediately. Phpbb2: Hide "Who Is Online" Text:
Hide "Time & Date, legend bar and text":
Phpbb3: Hide "Legend bar"
Hide "Stats"
Hide "Last post"
Hide "Navbar"
Punbb: Hide "Legend Bar"
Hide "Online list"
Hide "Time & Date"
Change "navigation background colour" Colour background:
Or Image background:
Craig |
Tutorial By : Placehold Icons Updated By @APE |
- on July 23rd 2008, 12:12 pm
- Search in: Tips & Tricks
- Topic: CSS Tutorial for your forums
- Replies: 1
- Views: 14169
How to add a theme to your board
| How to add a theme to your board |
How to add a theme to your board. PHPBB VERSION 2 There are a few ways to add a theme to your site. Firstly forumotion has a list of preset themes that you can find in "Admin Panel >> Display >> Choose a theme". You can select either the colours of the theme, or the images of the theme or both. It does this all automatically for you. Secondly you will see when choosing a theme that there is a tab for www.hitskin.com a site in conjunction with forumotion that has a database of phpbb 2 and phpbb 3 themes. You can choose any of these and it will be added automatically to the site. Please read this tutorial on how to install hitskin themes properly. Thirdly, you can manually add a theme. This is not easy for those with little HTML and CSS knowledge, so i firmly suggest creating a test board to practice on. I normally choose the standard subsilver theme from the choose a theme and install it on my test forum ready to begin. Step 1. Find a phpbb 2 theme you like from the many sites out there that offer themes. Google free phpbb themes. Download it to your computer. Step 2. Extract all files within the theme and search for the one that says its file type is a Cascading Style Sheet, The examples below are for the girltalk theme i use on my site. Open the Cascading Style Sheet and copy all the code within it. Girltalk CSS
Step 3. In "Admin Panel >> Display >> Pictures & Colors >> Colors", you will see the tab for your CSS Stylesheet at present. Click it. The box for it is most likely empty. Paste your copied CSS code in the empty white box and save. Leave default style sheet to yes. Step 4. You now need to host the images that your pasted CSS needs. body { background-image: url(images/girTalk2_bg.gif); background-repeat: repeat; background-color: #E6F6F9; margin: 0px; padding: 0px; height: 100%; scrollbar-face-color: #DEE3E7; scrollbar-highlight-color: #FFFFFF; scrollbar-shadow-color: #DEE3E7; scrollbar-3dlight-color: #D1D7DC; scrollbar-arrow-color: #EF6B6B; scrollbar-track-color: #EFEFEF; scrollbar-darkshadow-color: #98AAB1; as you can see from the snippet of the CCS i am using as an example, the part in bold needs to be changed. It is only half a URL. You need to find the image within the theme folder (it will have the same tite as the end of the code, for example in my case the image would be saved in the theme folder under: girTalk2_bg) and save it to your computer, then upload the image to the likes of servimg, photobucket imageshack etc. You then need to replace the link in bold, with the direct URL to your hosted picture. body { background-image: url(https://2img.net/r/ihimg/7878/23/girTalk2_bg.gif); background-repeat: repeat; background-color: #E6F6F9; margin: 0px; padding: 0px; height: 100%; scrollbar-face-color: #DEE3E7; scrollbar-highlight-color: #FFFFFF; scrollbar-shadow-color: #DEE3E7; scrollbar-3dlight-color: #D1D7DC; scrollbar-arrow-color: #EF6B6B; scrollbar-track-color: #EFEFEF; scrollbar-darkshadow-color: #98AAB1; Step 5. Work through your style sheet and theme folder saving images, hosting and changing URLs till they are all done. Then save. You can then preview your forum to see the changes. if your default themes headers etc are still present you need to go into modify the pictures and remove the URLS for them and save, as this will leave them empty and your CSS will take over. Step 6. You can then continue to use images from the unzipped theme files on your computer and hosting them, for the forum icons, buttons etc in "Admin Panel >> Display >> Pictures & Colors >> Pics Management". Its very time consuming. One you have uploaded all the new images, that should be your theme installed on your forum. |
| This tutorial was written by Zinex. Update by Sunny_D || 10. 07. '08 |
- on March 7th 2008, 10:17 am
- Search in: Frequently Asked Questions
- Topic: How to add a theme to your board
- Replies: 0
- Views: 11893

Page 4 of 4 •  1, 2, 3, 4
 Facebook
 Twitter
 Pinterest
 Youtube
