
 Portal
Adding Information Below a Photo
2 posters
Page 1 of 1

 Adding Information Below a Photo
 by Awesome Animals 18th March 2015, 01:25
Technical Details
Forum version : phpBB3Position : Member
Concerned browser(s) : Opera
Who the problem concerns : Yourself
Forum link : http://awesomeanimals.forumakers.com
Description of problem
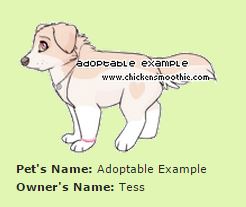
I would like to achieve something like on this websitehttp://www.chickensmoothie.com/adoptables/?sid=2002c5baf3db94795f77d7cb9a301c31
where you can click on a picture and it will come up with a form where you can enter information about the photo and it saves the photo to a page on the users profile with the info below it.
Like this.
Does anybody know how to achieve something like this?
Ashley.

Awesome Animals- New Member
- Posts : 22
Reputation : 1
Language : English -


Awesome Animals- New Member
- Posts : 22
Reputation : 1
Language : English -
Re: Adding Information Below a Photo
by Ange Tuteur 19th March 2015, 22:39
Hi @Awesome Animals,
To start, I suppose you could create a new profile field. Go to Administration Panel > Users and groups > Profiles and click the plus to create a new profile field.
For the type make sure to choose text zone. This way we can format bbcode, and create something like this :
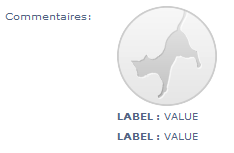
With this :
The rest of the content is up to you.
Now applying the content would have to be done by creating a small form and some AJAX. ...how extensive do you plan on this form being ? I can write a small example if you'd like.
To start, I suppose you could create a new profile field. Go to Administration Panel > Users and groups > Profiles and click the plus
to create a new profile field.For the type make sure to choose text zone. This way we can format bbcode, and create something like this :
With this :
- Code:
[img]http://i38.servimg.com/u/f38/19/06/98/92/roa10.png[/img]
[b]LABEL :[/b] VALUE
[b]LABEL :[/b] VALUE
The rest of the content is up to you.
Now applying the content would have to be done by creating a small form and some AJAX. ...how extensive do you plan on this form being ? I can write a small example if you'd like.

Ange Tuteur- Forumaster
-
 Posts : 13246
Reputation : 3000
Language : English & 日本語
Location : Pennsylvania -
Re: Adding Information Below a Photo
by Awesome Animals 20th March 2015, 00:25
I would just like to have it so members can insert the name they would like and there user name below it.
Awesome Animals- New Member
- Posts : 22
Reputation : 1
Language : English -
Re: Adding Information Below a Photo
by Ange Tuteur 20th March 2015, 02:07
Okay, first add the following style rule to your stylesheet.
Display > Colors > CSS stylesheet
This will setup the style for our overlay. Now we need to get the ID of your field's textarea, so go to Modules > JavaScript codes management and create a new script
Placement : In all the pages
Paste the following code and submit :
Now go to your profile in the forum and click inside the textarea of the profile field you create before. It should alert you an ID which you should copy to your clipboard. When you have it save somewhere, go ahead and disable this script.
Now, create a new script with the following contents :
Title : Your choice
Placement : In all the pages
At the top of the script you'll see the variable field. Replace profile_field_2_-20 by the ID which you copied from the alert before. This will bind our popup to the field so it displays when we click it.
The last editable option at the direct top is opts :
This is the list of available "pets" you want to offer members a choice of using. To the left of the colon is the name, and to the right of the colon is the image assigned to it.
More simply : NAME : IMAGE
You can add as many pairs name:image pairs as you want. Just make sure that multiple pairs are separated by a comma. The examples I setup by default should give you an idea of how it works.
When you're finished, go ahead and save the script. Now, when you go to edit this field by clicking the textarea, it should open a popup like this :
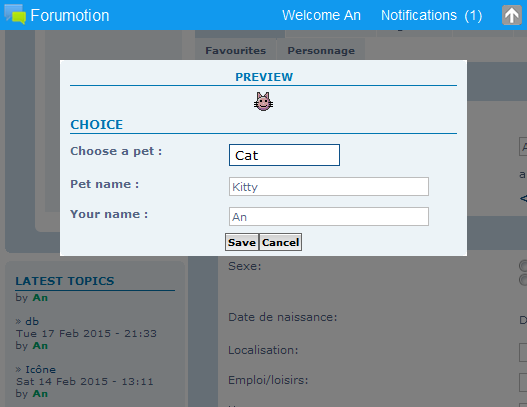
Clicking save will added the selected content to the textarea, whereas clicking cancel will ignore input and close the popup.
If any questions, let me know.
See you
Display > Colors > CSS stylesheet
- Code:
.overlay{background:#000;background:rgba(0,0,0,0.5);position:fixed;top:0;left:0;right:0;bottom:0;z-index: 999;padding:60px}
This will setup the style for our overlay. Now we need to get the ID of your field's textarea, so go to Modules > JavaScript codes management and create a new script
Placement : In all the pages
Paste the following code and submit :
- Code:
$(function() {
  $('textarea').click(function() {
    this.id && alert(this.id);
  });
});
Now go to your profile in the forum and click inside the textarea of the profile field you create before. It should alert you an ID which you should copy to your clipboard. When you have it save somewhere, go ahead and disable this script.
Now, create a new script with the following contents :
Title : Your choice
Placement : In all the pages
- Code:
$(function(){
  var field = 'profile_field_2_-20',
      opts = {
    'Cat' : 'http://2img.net/i/fa/i/smiles/icon_cat.png',
    'Pig' : 'http://2img.net/i/fa/i/smiles/icon_porc.png',
    'Monkey' : 'http://2img.net/i/fa/i/smiles/icon_monkey.png',
    'Elephant' : 'http://2img.net/i/fa/i/smiles/icon_elephant.png',
    'Alien' : 'http://2img.net/i/fa/i/smiles/alien.png'
  },

  win = document.createElement('DIV'), choix = document.createElement('SELECT'), prev = document.createElement('IMG'), nom = document.createElement('INPUT'), pseudo, save = document.createElement('INPUT'), cancel, f = document.getElementById(field);
  if (!f) return;
  win.style.display = 'none';
  win.className = 'overlay';
  win.innerHTML = '<div class="panel"><div class="inner"><span class="corners-top"><span></span></span><div style="text-align:center"><h3>Preview</h3></div><fieldset><h3>Choice</h3><dl><dt><label>Choose a pet : </label></dt><dd></dd></dl><dl><dt><label>Pet name : </label></dt><dd></dd></dl><dl><dt><label>Your name : </label></dt><dd></dd></dl></fieldset><div style="text-align:center;"></div><span class="corners-bottom"><span></span></span></div></div>';

  nom.type = 'text';
  nom.className = 'inputbox';
  pseudo = nom.cloneNode();
  pseudo.value = _userdata.username;

  save.type = 'button';
  save.className = 'button1';
  save.value = 'Save';
  cancel = save.cloneNode();
  cancel.value = 'Cancel';

  save.onclick = function() {
    f.value = '[img]' + choix.value + '[/img]\n[b]Pet Name :[/b] ' + nom.value + '\n[b]Owner :[/b] ' + pseudo.value;
    win.style.display = 'none';
  };

  cancel.onclick = function() { win.style.display = 'none' };

  choix.innerHTML = '<option value="http://2img.net/i/fa/empty.gif" selected>None selected</option>';
  for (var i in opts) {
    var o = document.createElement('OPTION');
    o.innerHTML = i;
    o.value = opts[i];
    choix.appendChild(o);
  }

  choix.onchange = function() { prev.src = this.value };
  prev.src = 'http://2img.net/i/fa/empty.gif';

  win.firstChild.firstChild.firstChild.nextSibling.appendChild(prev);
  win.getElementsByTagName('DD')[0].appendChild(choix);
  win.getElementsByTagName('DD')[1].appendChild(nom);
  win.getElementsByTagName('DD')[2].appendChild(pseudo);
  win.firstChild.firstChild.lastChild.previousSibling.appendChild(save);
  win.firstChild.firstChild.lastChild.previousSibling.appendChild(cancel);
  document.body.appendChild(win);

  f.onfocus = function() {
    this.blur();
    win.style.display = '';
  };
});
At the top of the script you'll see the variable field. Replace profile_field_2_-20 by the ID which you copied from the alert before. This will bind our popup to the field so it displays when we click it.
The last editable option at the direct top is opts :
- Code:
      opts = {
    'Cat' : 'http://2img.net/i/fa/i/smiles/icon_cat.png',
    'Pig' : 'http://2img.net/i/fa/i/smiles/icon_porc.png',
    'Monkey' : 'http://2img.net/i/fa/i/smiles/icon_monkey.png',
    'Elephant' : 'http://2img.net/i/fa/i/smiles/icon_elephant.png',
    'Alien' : 'http://2img.net/i/fa/i/smiles/alien.png'
  },
This is the list of available "pets" you want to offer members a choice of using. To the left of the colon is the name, and to the right of the colon is the image assigned to it.
More simply : NAME : IMAGE
You can add as many pairs name:image pairs as you want. Just make sure that multiple pairs are separated by a comma. The examples I setup by default should give you an idea of how it works.
When you're finished, go ahead and save the script. Now, when you go to edit this field by clicking the textarea, it should open a popup like this :
Clicking save will added the selected content to the textarea, whereas clicking cancel will ignore input and close the popup.
If any questions, let me know.
See you
Ange Tuteur- Forumaster
- Posts : 13246
Reputation : 3000
Language : English & 日本語
Location : Pennsylvania -
Re: Adding Information Below a Photo
by Awesome Animals 20th March 2015, 02:27
Thank you and I don't what to be a bother but I was hoping to do something where they when to this page on the forum http://awesomeanimals.forumakers.com/h1-adoption-center and clicked on the pet they wanted. Once they did that a form came up where they entered the information they wanted for the pet. Then once they saved it it sent it so a separate tab on there profile.
Awesome Animals- New Member
- Posts : 22
Reputation : 1
Language : English -
» Help with Adding a Photo on my page.
» Adding a Photo as the Chatbox Background
» adding a small photo to start of forum topic
» Adding information to Board Statistics
» Adding Additional information to Profile
» Adding a Photo as the Chatbox Background
» adding a small photo to start of forum topic
» Adding information to Board Statistics
» Adding Additional information to Profile
Page 1 of 1
Permissions in this forum:
You cannot reply to topics in this forum Facebook
 Twitter
 Pinterest
 Youtube
