Basic Post Layout
Page 1 of 1
 Basic Post Layout
| Basic Post Layout |
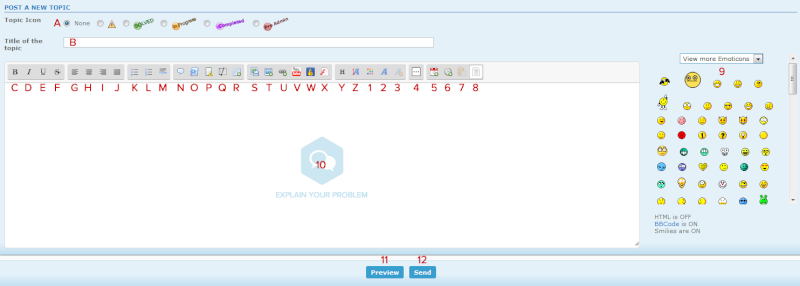
Hello Forumers, Following some recent feedback from some users asking for more tutorials, I will begin to make some, this one is to do with the basic interface when you make a post. The picture below is the image you will see when you make a post, the table below explains what each button that has been numbered does.  A : This is the topic icon, if there are icons for the topic they will be here. B : This is the Subject box; You should type the name of the topic here. C : Pressing this button will insert Bold tags. D : Pressing this button will insert Italic tags. E : Pressing this button will insert Underline tags. F : Pressing this button will insert G : Pressing this button will insert tags to align the text to the Left. H : Pressing this button will insert tags to align the text to the Center. I : Pressing this button will insert tags to align the text to the Right. J : Pressing this button will insert tags to Justify the text alignment. K : Pressing this button will insert a Bullet List. L : Pressing this button will insert a Numbered List. M : Pressing this button will insert a Horizontal Rule. N : Pressing this button will insert Quote tags. O : Pressing this button will insert Code tags. P : Pressing this button will insert Spoiler tags. Q : Pressing this button will insert Hide tags; this will hide content for members who haven't replied. R : Pressing this button will insert Table tags. S : Pressing this button will allow you to Upload an image. T : Pressing this button will insert Image tags. U : Pressing this button will insert URL tags. V : Pressing this button will insert Youtube tags, for Youtube videos. W : Pressing this button will insert Dailymotion tags, for Dailymotion videos. X : Pressing this button will insert Flash tags, for Flash media. Y : Pressing this button will open a popup to select Header tags. Z : Pressing this button will open a popup to select Font Size tags. 1 : Pressing this button will open a popup to select Color tags. 2 : Pressing this button will open a popup to select Font Family tags. 3 : Pressing this button will remove the formatting in mode WYSIWYG. 4 : Pressing this button will display additional editor options. 5 : Pressing this button will insert the current date. 6 : Pressing this button will insert the current time. 7 : Pressing this button will insert copied text in mode WYSIWYG. 8 : Pressing this button will toggle the editor mode between Source and WYSIWYG. 9 : This is the smiley box, clicking any of the smilies will add them to the editor. 10 : This is the editor, type what you want. 11 : This is the preview button, clicking it will allow you to preview your message. 12 : This is the submit button, clicking it will post your message. |
| This tutorial was written by Tilum. Updated by Ange Tuteur - 20/10/2014 Updated by Buttercup 13/01/2015 |
Last edited by APE on July 2nd 2016, 12:24 am; edited 2 times in total (Reason for editing : post layout updated)

Tilum- Active Poster
-
 Posts : 1756
Reputation : 62
Location : England.
 Similar topics
» Basic Layout Questions
» Forum Post Layout Issues
» Learning the basic CSS
» Some basic definitions (Legend)
» My basic CSS is error
» Forum Post Layout Issues
» Learning the basic CSS
» Some basic definitions (Legend)
» My basic CSS is error
Page 1 of 1
Permissions in this forum:
You cannot reply to topics in this forum
 Home
Home
 by Tilum February 1st 2009, 9:48 pm
 Facebook
 Twitter
 Pinterest
 Youtube
